Using Meta Pixel with Google Tag Manager on Shopify
If you're using Google Tag Manager and the TrackPixel.app to manage tags for your Shopify website, you can add your Meta Pixel to your Google Tag Manager account to measure and optimize the results of your Facebook advertising on Shopfiy.
Follow these instructions to install the Google Tag Manager pixel on your Shopify store.
Install your Meta Pixel
- Log in to your Google Tag Manager account.
- Select your website's container and click Add a new tag.
- Click Custom HTML Tag and enter a name for your tag.
- Go to Meta Events Manager and select Add Event.
- Select From a New Website.
- Select Install code manually.
- Select Copy Code to copy the entire Pixel base code.
- Return to Google Tag Manager and paste the code in the HTML container.
- Click the Advanced Settings dropdown and select Once per page under Tag firing options.
- Under Fire On, select All Pages.
- Click Create Tag.
Create action-specific tags
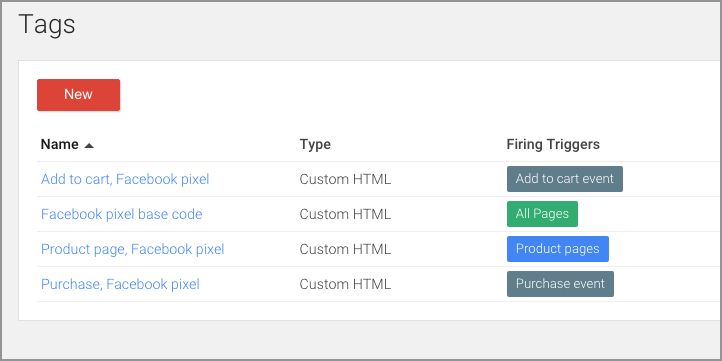
Now that you have your base code installed, you can create specific tags for the different types of pages and events on your website (ex: product page, add to cart button, purchase page).
- In Google Tag Manager, select your website's container and click Add a new tag.
- Name your tag, then insert just the snippet of code relating to that event, plus any other variables you want to receive. Keep in mind your variables (ex: product_ids and product_name) may be different from the example below.
- Click Custom HTML Tag and enter a name for your tag.
- Copy and paste the snippet of code relating to the event and any other variables you want to receive. Keep in mind your variables (ex: product_ids and product_name) may be different from the example below.
- Under Advanced Settings, select Once per event under Tag firing options.
- Under Tag Sequencing check the box and select your base code tag, to ensure this tag fires after your base code.
- Under Fire On, select the trigger that is relevant for your site.
- Click Create Tag.

- In the same way, create tags for the other events on your website (ex: add to cart, purchase). See the examples below.


- When you're finished creating tags, click Publish.
Check if your Meta Pixel is working
Once you've uploaded all your events, you should check if your Pixel is working correctly. To check that your Pixel is working properly on your live site:
- Navigate to the web page your Pixel was added to. If it's working, your Pixel detail page in Events Manager will show your Pixel's status as Active and you'll see activity reported in the dashboards. Learn more about your Pixel data in Events Manager.
- If your Pixel's status is No activity yet, you can use the Meta Pixel Helper to troubleshoot the problem. Once the Pixel Helper is installed in your Chrome browser, a small icon will appear next to your address bar. Navigate to your website in your Chrome browser and click the Meta Pixel Helper icon. You can see which Pixel events were found on the page and whether they have loaded successfully, or see troubleshooting tips if there are any issues. Learn more.

Once you've successfully setup your Pixel, learn how run ads across Meta technologies using conversion optimization.